- 03 Jul 2024
How easily create forms in Umbraco
Reveal the most straightforward way to create forms in Umbraco.
What are Umbraco Forms?
Umbraco Forms provides a comprehensive solution for creating, managing, and processing forms within the Umbraco CMS environment. It empowers users to build interactive and engaging web forms to collect data, gather feedback, and facilitate online interactions.
Benefits of Umbraco Forms
Here are some key features and functionalities of Umbraco Forms:
Form Creation: Umbraco Forms provides a user-friendly interface for building forms without the need for coding. Users can drag and drop form elements such as text fields, checkboxes, radio buttons, dropdown menus, and file upload fields to create custom forms.
Conditional Logic: Users can set up conditional logic within forms, which enables the form to show or hide certain fields based on user responses. This feature allows for more dynamic and personalized form experiences.
Validation: Umbraco Forms includes built-in validation options to ensure that users provide the necessary information and format it correctly. Validation rules can be applied to individual form fields to enforce specific requirements.
Submission Handling: Form submissions are stored within Umbraco, allowing users to view and manage submissions directly from the back office. Users can export submissions, receive email notifications upon form submission, and integrate with third-party services for further processing.
Integration: Umbraco Forms can be integrated with other Umbraco features and third-party tools, such as email marketing platforms, CRM systems, and payment gateways. This allows for seamless data exchange and automation between forms and other systems.
Security: Umbraco Forms includes security features to protect against spam submissions and malicious attacks. Users can enable CAPTCHA verification and implement other measures to enhance form security.
How to create forms in Umbraco easily
The logical step now would be to describe how to create forms in Umbraco using Umbraco forms, but we will not do this, since many articles have already done this. In addition, the process of installing and using native forms in Umbraco is not so simple. And it’s worth noting that you won’t be able to try these forms for free since they are paid and do not have a free trial version. If you are interested in using Umbraco forms, you can watch this video on the Umbraco channel.
We want to show an alternative way to install forms on Umbraco. This method is easy to learn and you can try it for free.
So, let's get started.
Step 1. Go to the free form editor CommonNinja.
We will create a simple contact form.
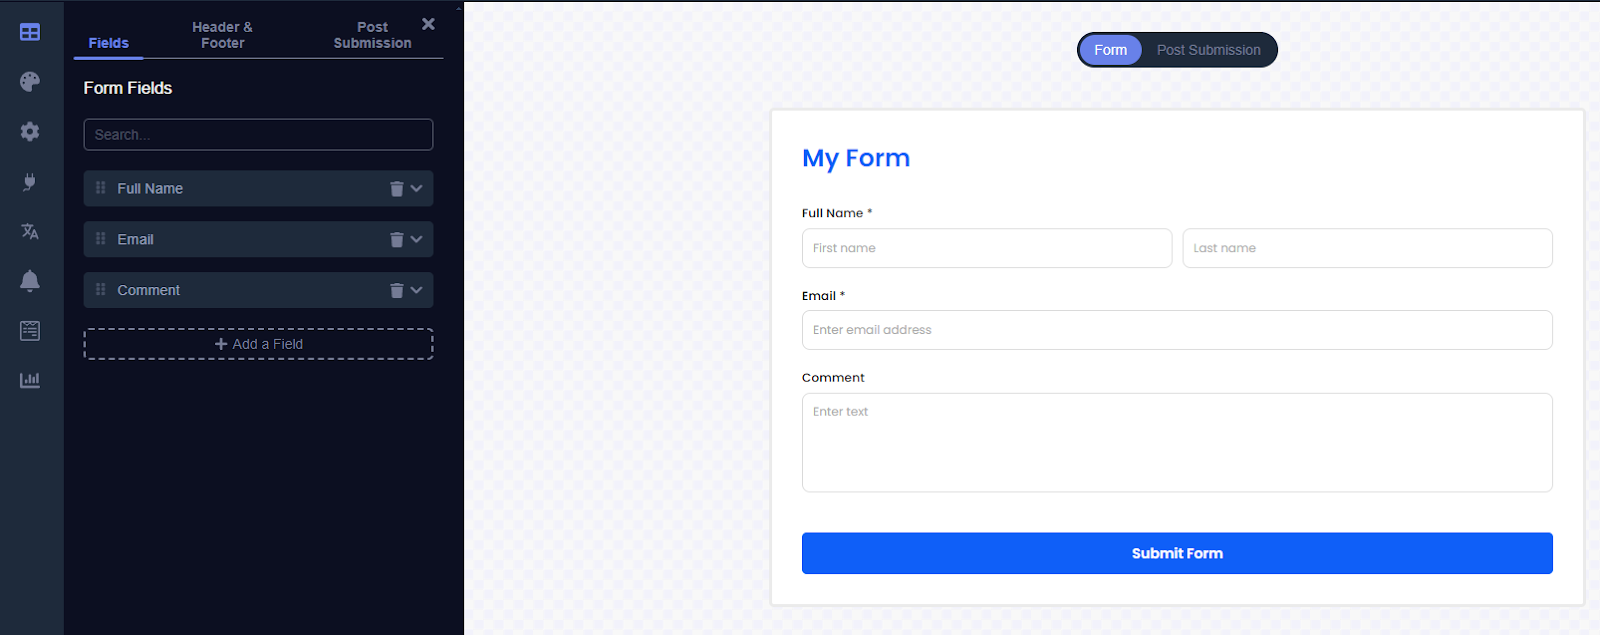
On the left, we will have a settings panel where we can configure each form field in detail, and on the right, we will have a visual editor that will show how our form will look on the site.
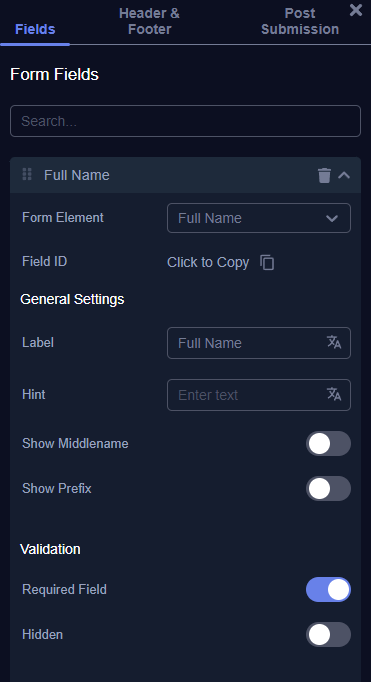
Step 2. Set up our fields.
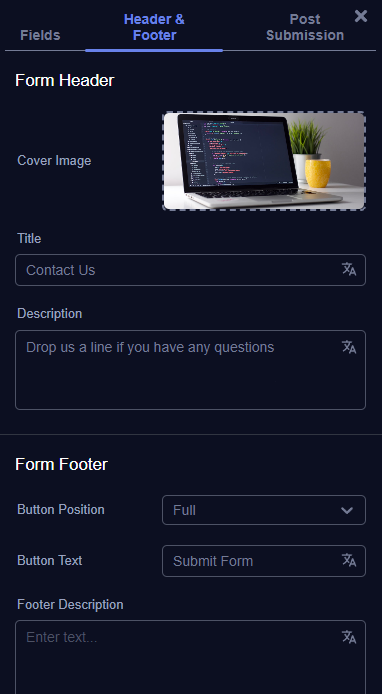
Step 3. Customize the visual design.
In our case, we changed the image, title, and accompanying text of the form
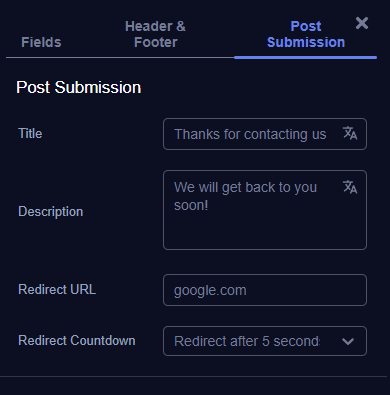
Step 4. Set up a message after filling out the form.
In addition to the title and message that the user sees after filling out the form, you can also configure the site's address where the user will be redirected after reading the message.
Step 5. The form is ready.

Step 6. Generate the form code to integrate it into the site.
Click on the icon next to the Preview button.

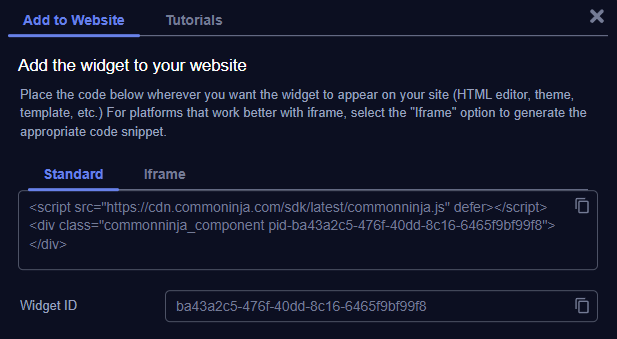
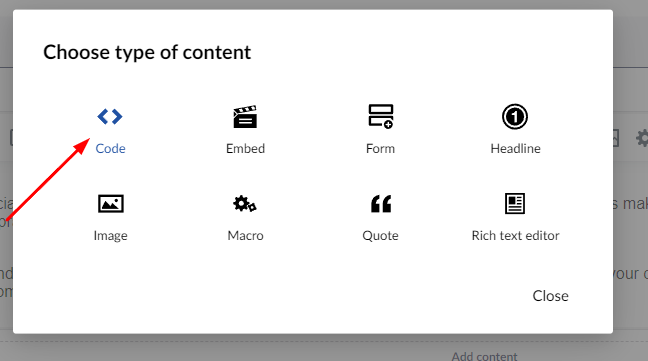
Step 7. Copy the received code and go to the Umbraco admin panel.
Find the Code component and copy our code into it. Now you can see a form on your website.
All form submissions will be stored in the Submissions section.

Sum up
This is how quickly and easily you can create and connect forms to your Umbraco website. This is just one example of forms; other examples include creating questionnaires, subscription forms for news and updates, and many others. Our latest Umbraco templates support the Forms feature, including professionally designed Contact and Sign-Up forms.
You might also like
- 07 May 2025
Umbraco Block Grid Editor Explained
The Umbraco Block Grid Editor is a powerful property editor that lets developers build rich, component-based layouts. Introduced to replace older grid editors, it supports modern page design with nested blocks, layout control and flexibility, while making content editors experience better. If you’re building content heavy sites, understanding the block grid is key to mastering Umbraco page layout.
Best Articles


Best templates for Umbraco CMS

Umbraco Block Grid Editor Explained

Best tools for SEO optimization in Umbraco
