ByteEditor Website Builder
Create ready block
Following this instruction's steps, you can create a new banner with the video on the background. You can recreate this block using the code snippets provided in the guide, or modify the steps to tailor it to your specific needs.
Expected result
Your Headline
Your subtitle
In order to create a new banner, for example, Banner With Video, we need a back office view, a controller, and a front view
Step 1. Basic changes to the code
- Open the project folder
- Open the “App_Plugins” folder
- Create a folder for custom layouts, for example, name “CustomBlockView”. If you already have this folder, please open it.
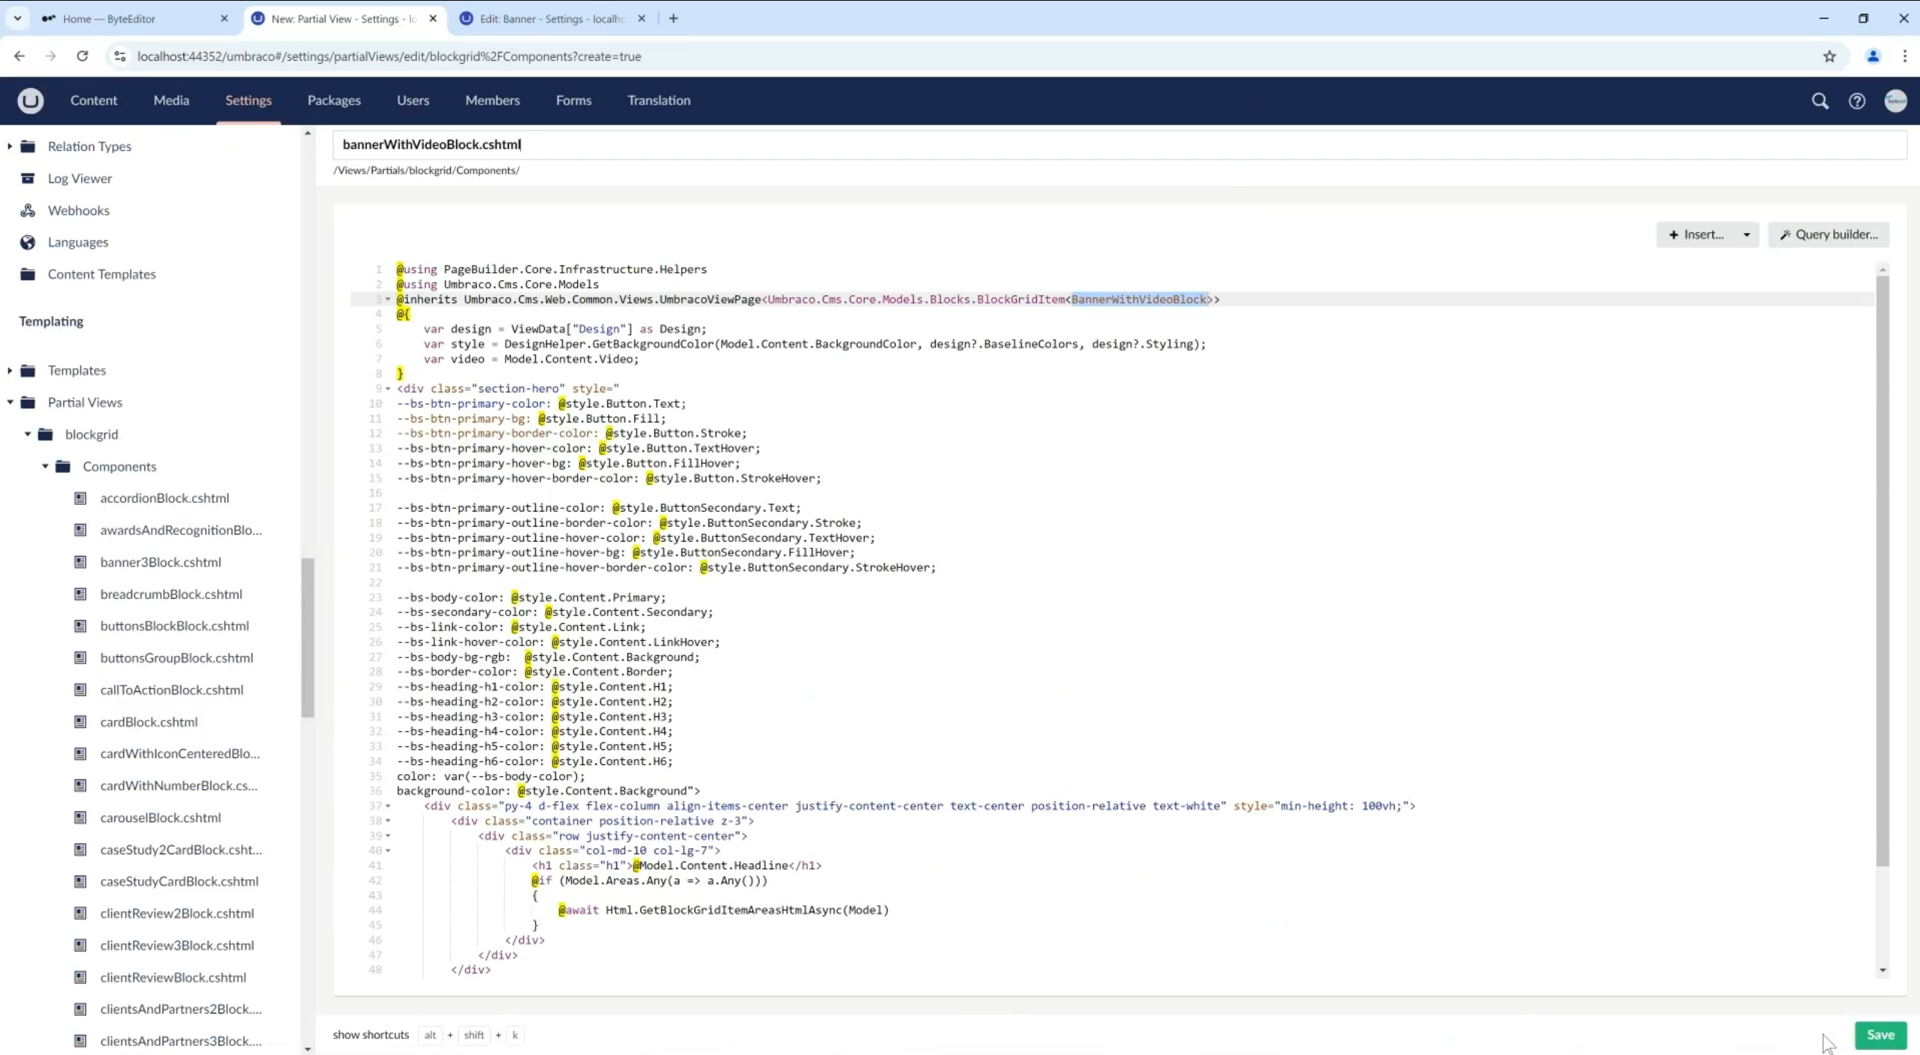
- In the folder create a test document named “bannerWithVideoBlock.html”
- Please copy the following code and paste it into the file
6. Create a test document named “bannerWithVideoBlock.controller.js”
7. Copy the following code and paste it into the file
8. Go to the Umbraco website
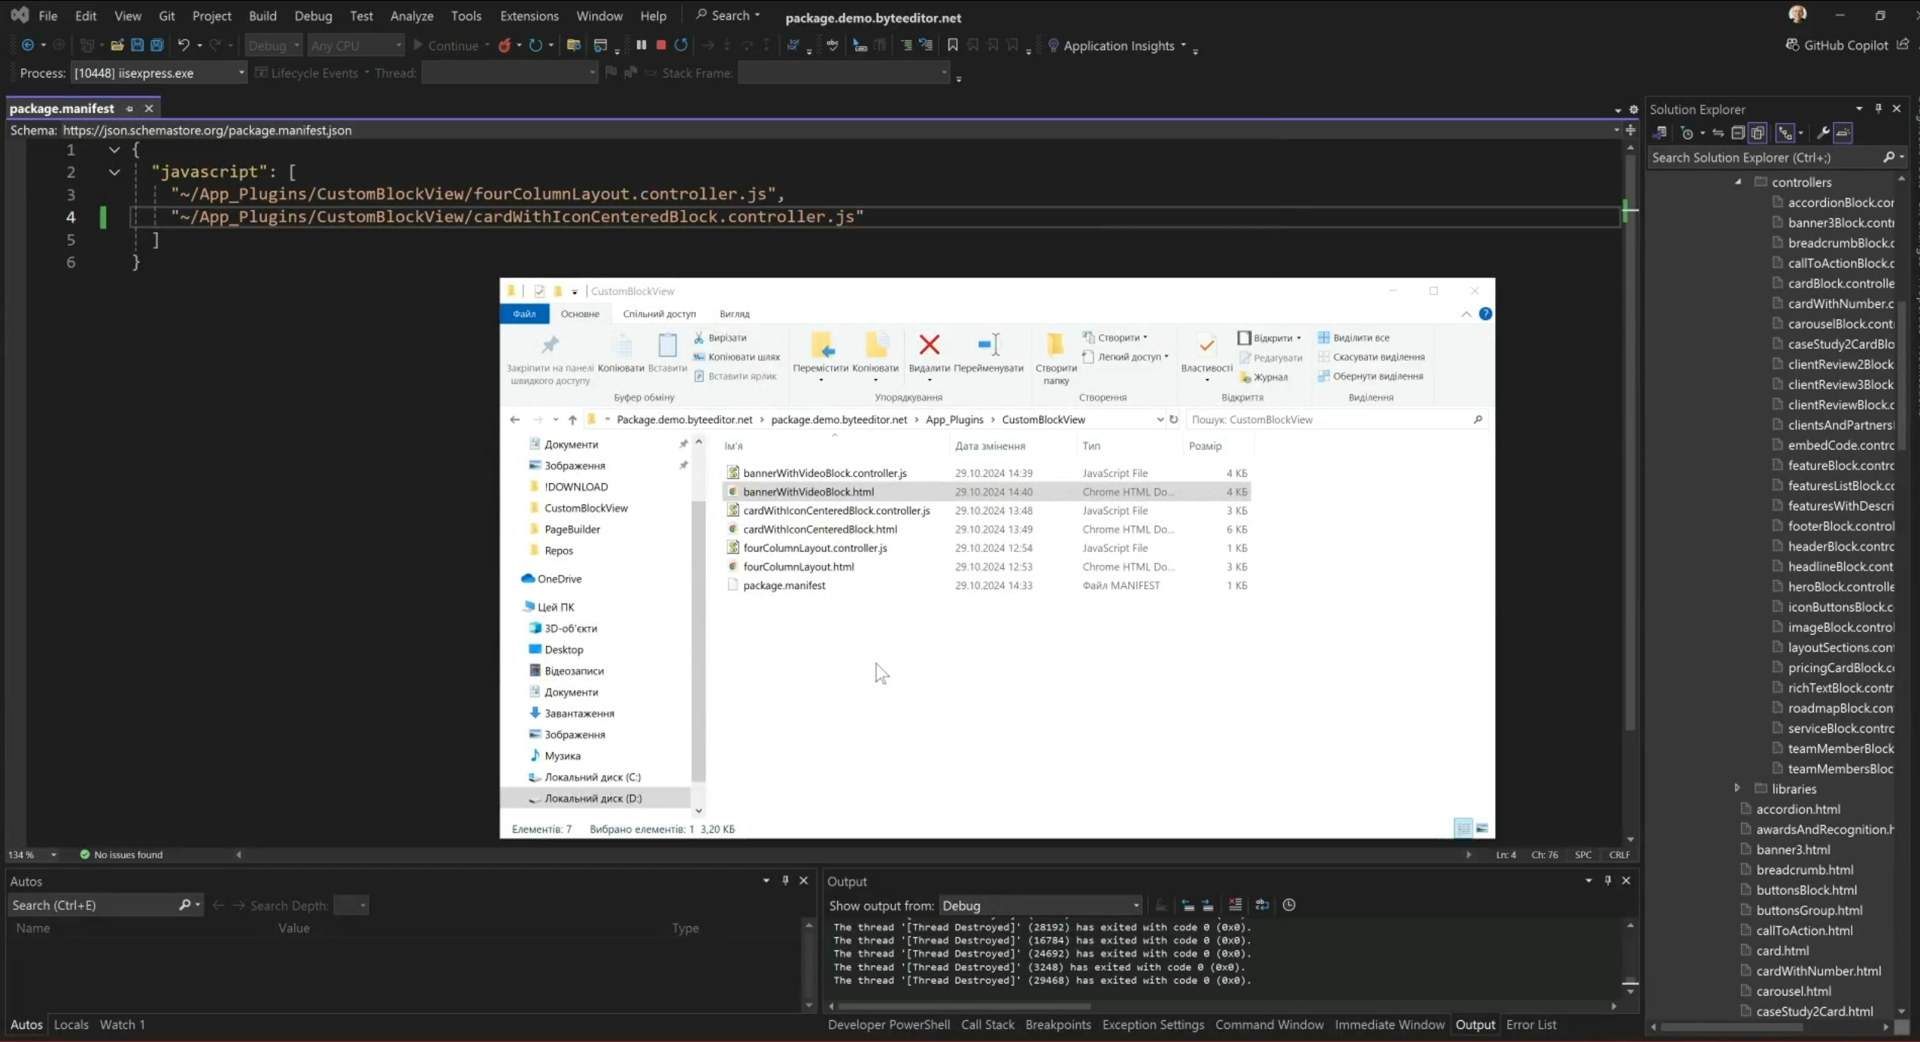
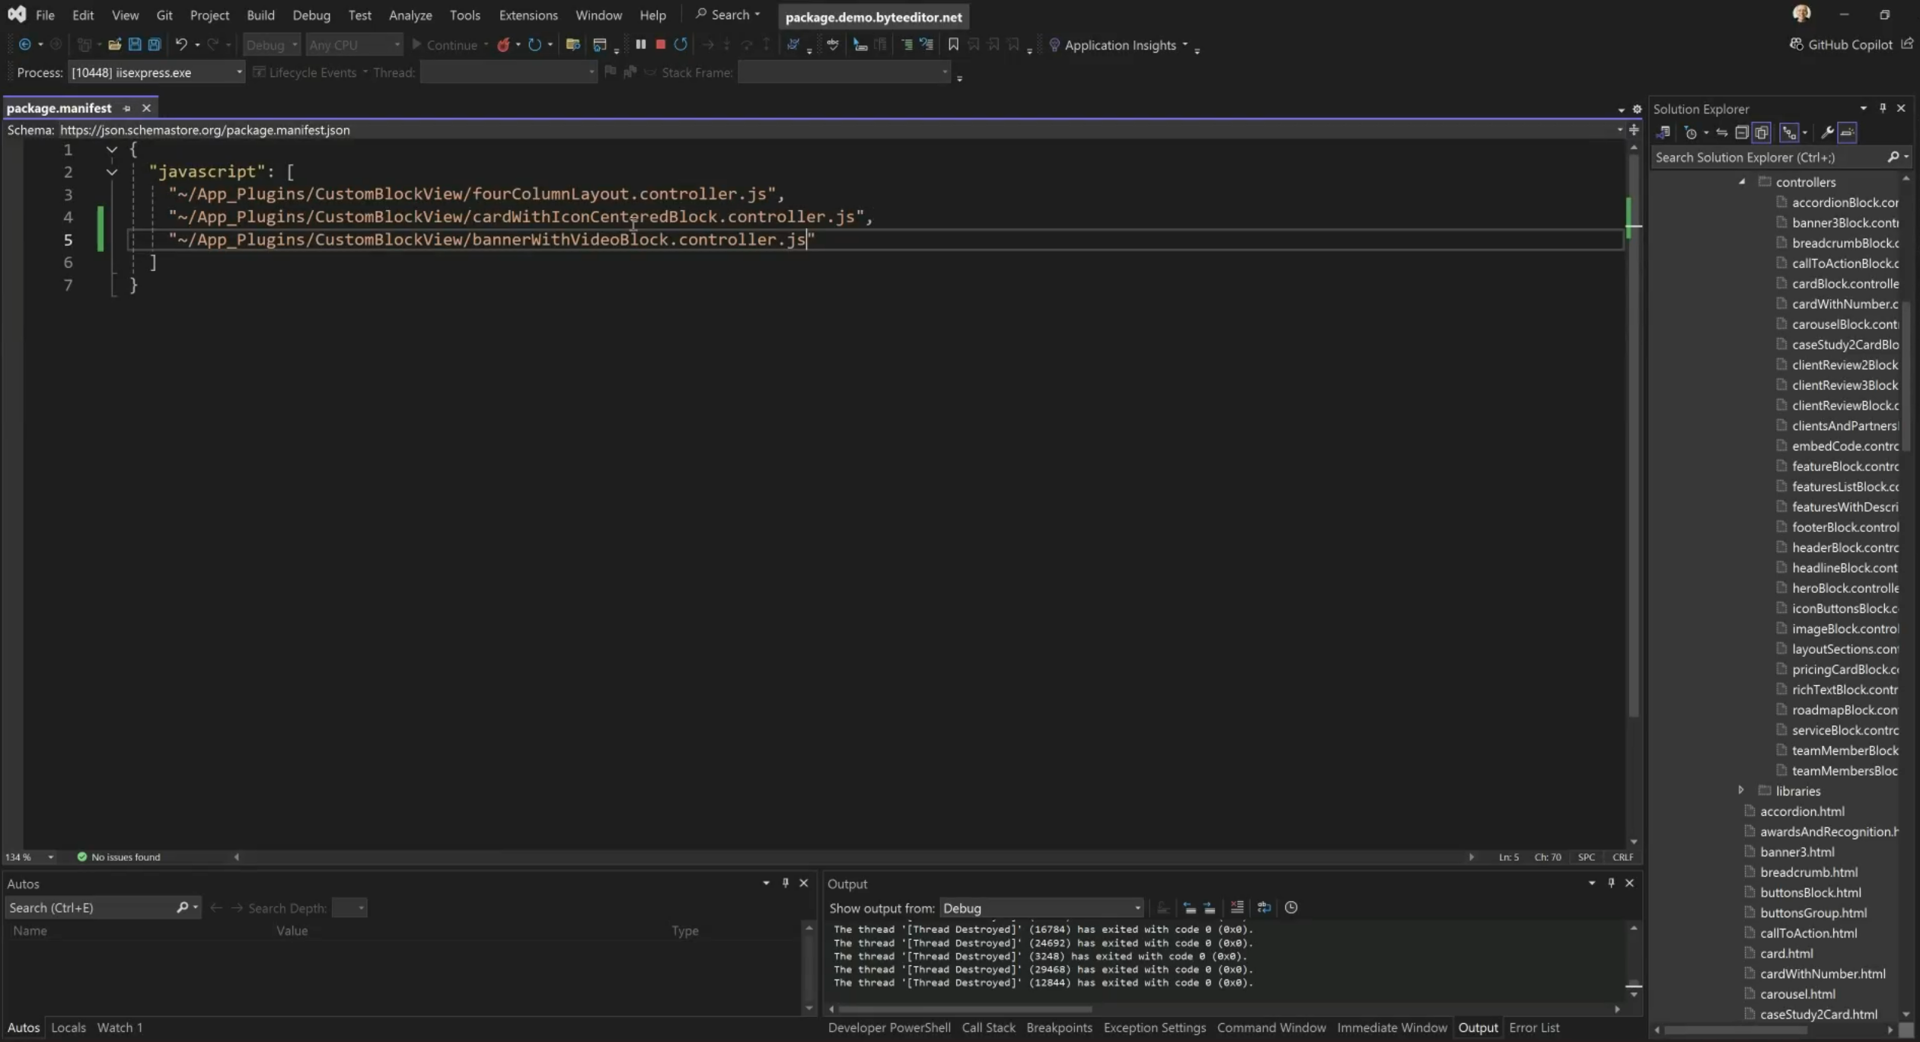
9. Create a text document named “package. manifest” in the “CustomBlockView” folder. If you already have this document, please open it.
10. Add the following JSON to the package.manifest file:
11. Restart the project to start the controller.
Step 2. How to create a layout in Umbraco
1. Run your project locally where the “ByteEditor Site Builder 1.X” package is installed, and open the Umbraco back office.
2. Open the tab “Settings”.
3. Expand the Document Types folder. Expand the Blocks Folder.
4. Hover over the "Ready Layout Blocks" folder in the content tree you will see this icon '...'. Click the icon '...'.
5. Click the “Create” button.
6. Select “Element type” from the list.
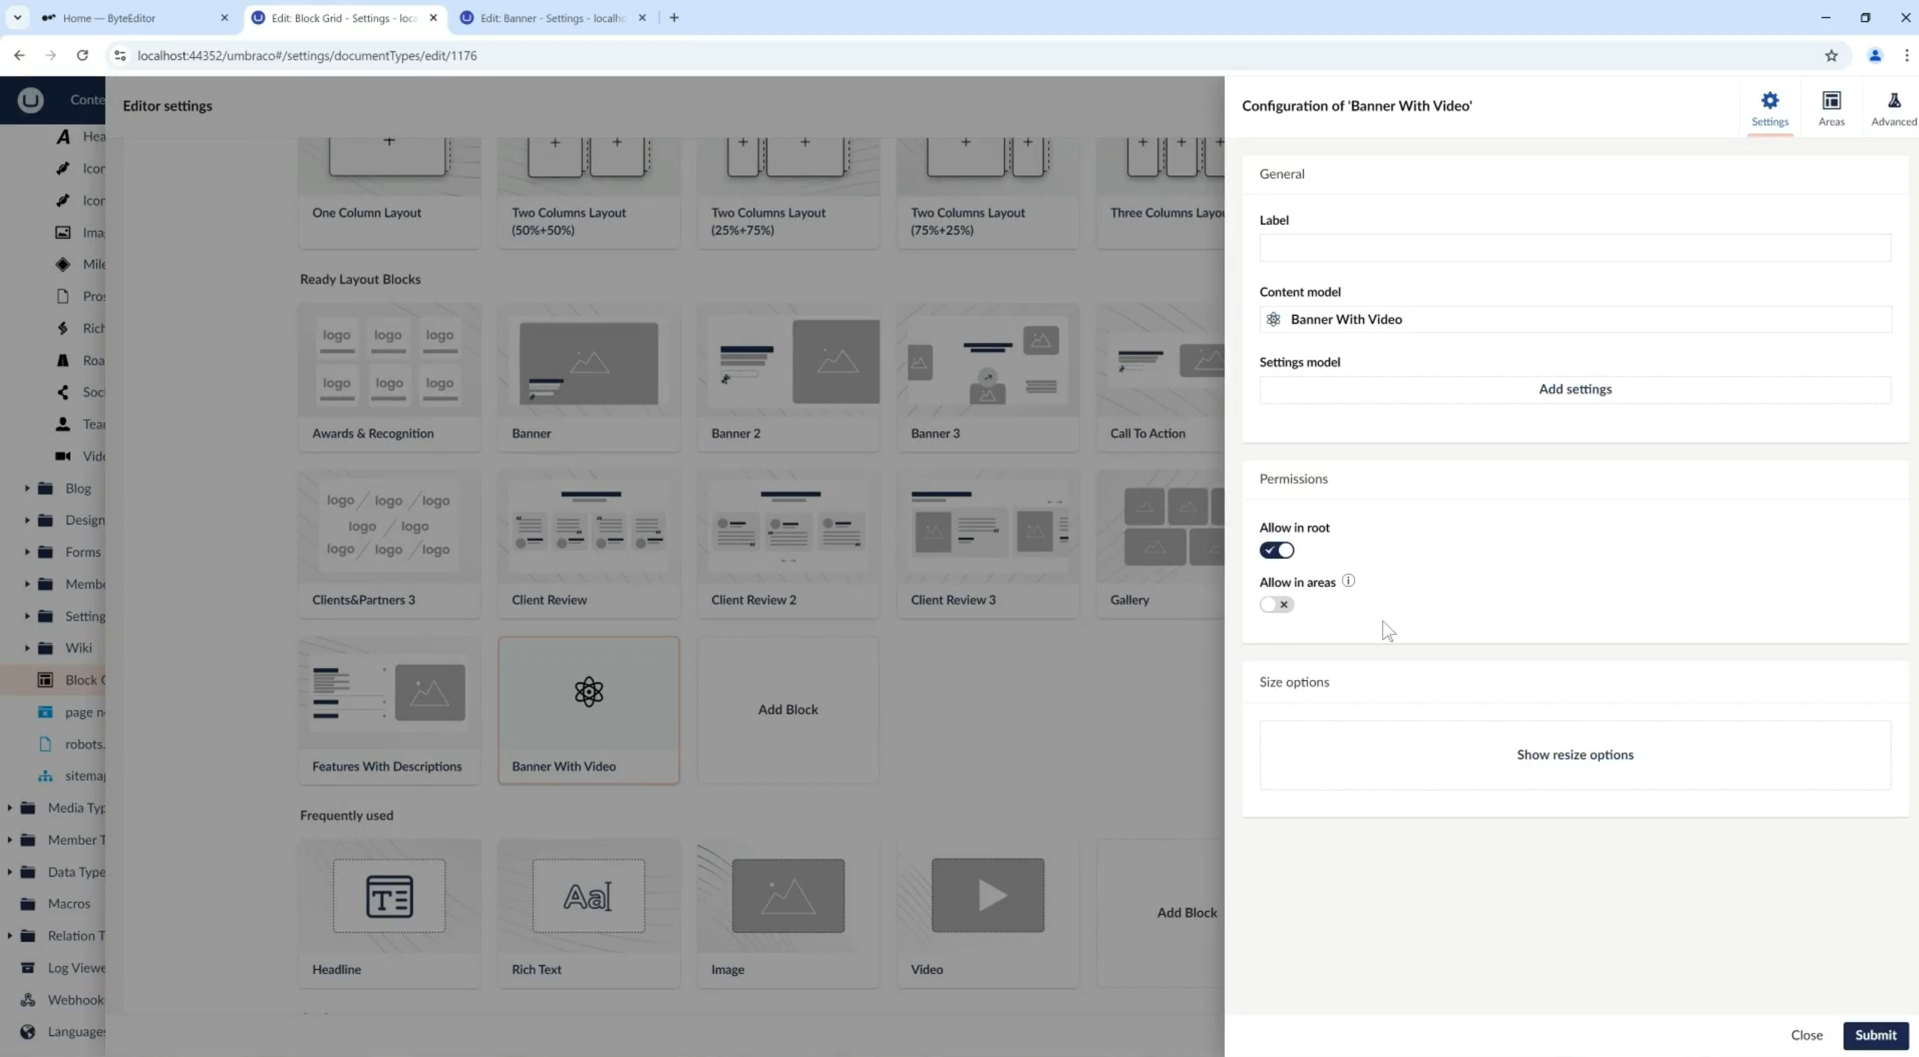
7. Name the "Banner With Video" block.
8. Add an icon for the layout.
9. On the right side, next to the “lock” icon, change the text from “bannerWithVideo” to “bannerWithVideoBlock”.
10. Click on the "Add group" button
11. Name the group “Content”
12. Click on the "Add property" button
13. Name the property “Headline”
14. Click on the "Select editor" button
15. Select “Textbox” from the list. Then select "Text string"
16. Click on the "Submit" button
17. Make the Field mandatory by clicking on the corresponding toggle button on the Property Settings screen.
18. Click on the "Submit" button

19. Click on the "Add property" button
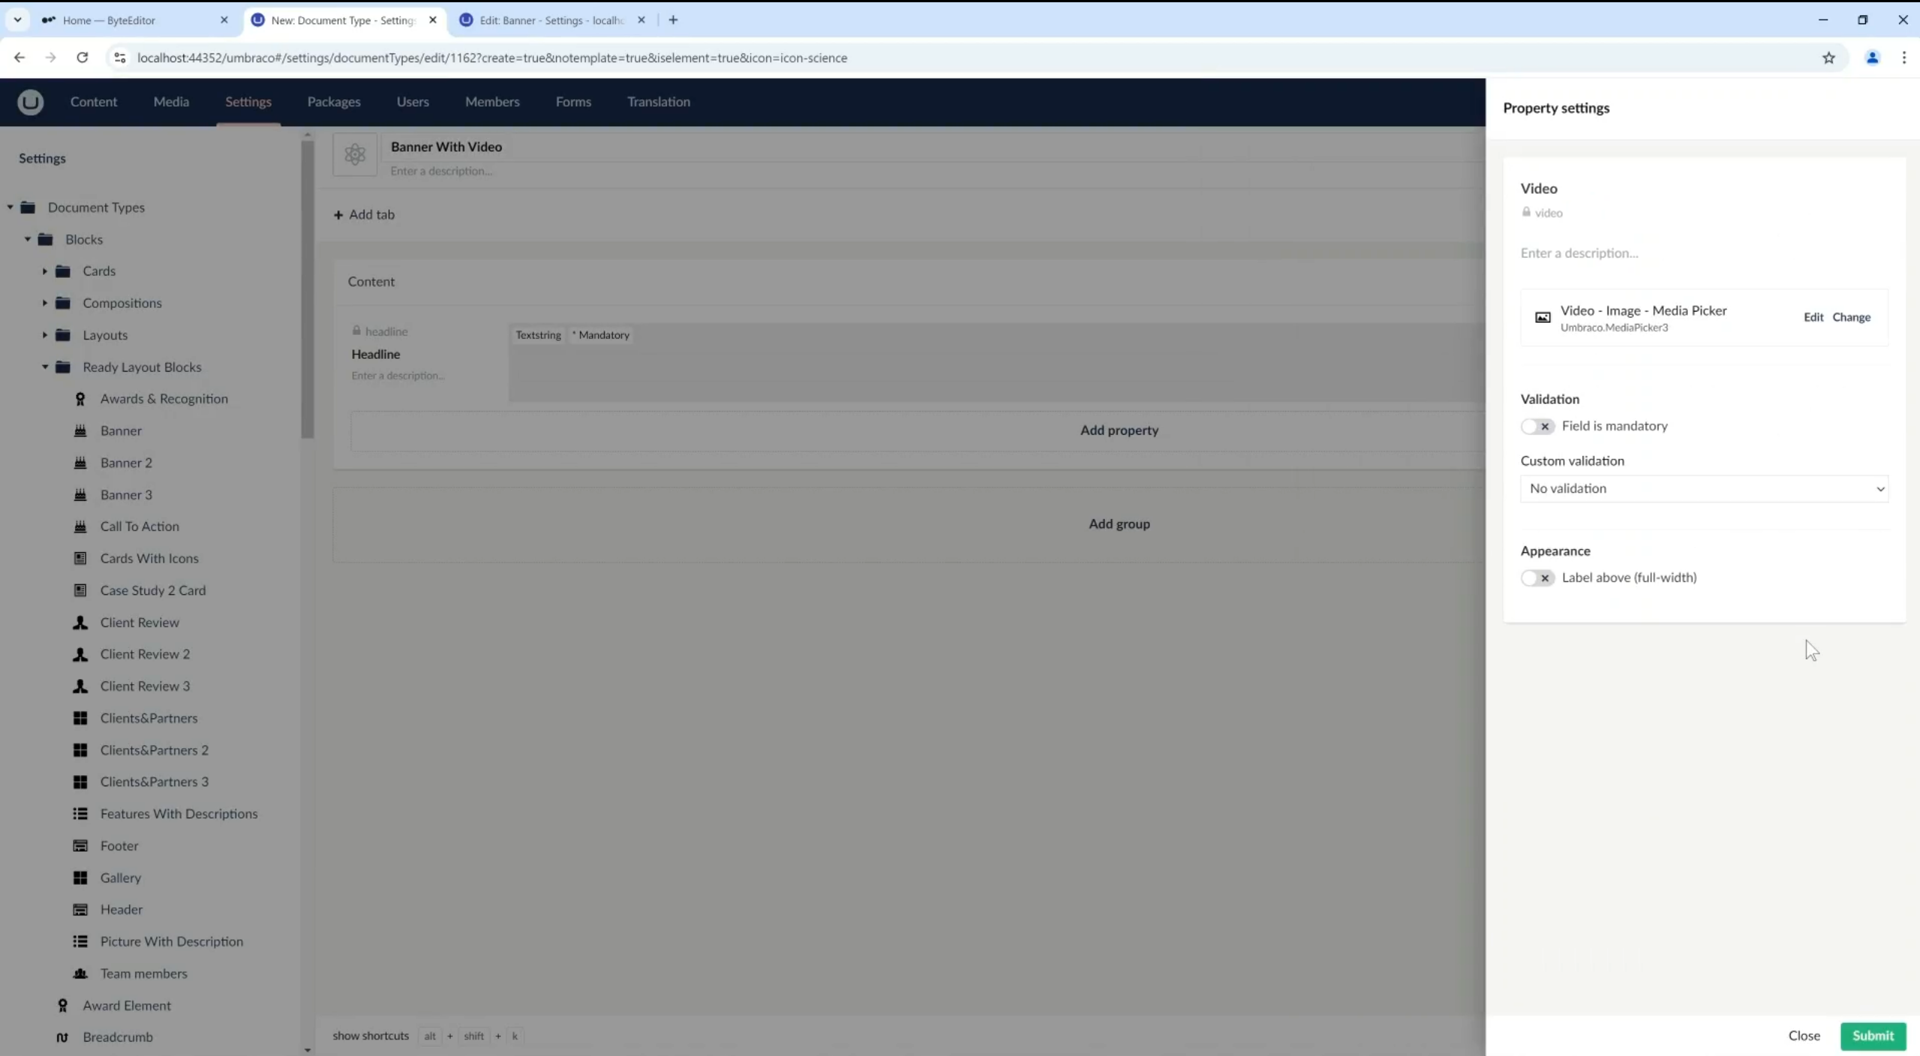
20. Name the property “Video”
21. Click on the "Select editor" button
22. Select “Media Picker” from the list. Then select the configuration called "Video - Image - Media Picker"
23. Click on the "Submit" button
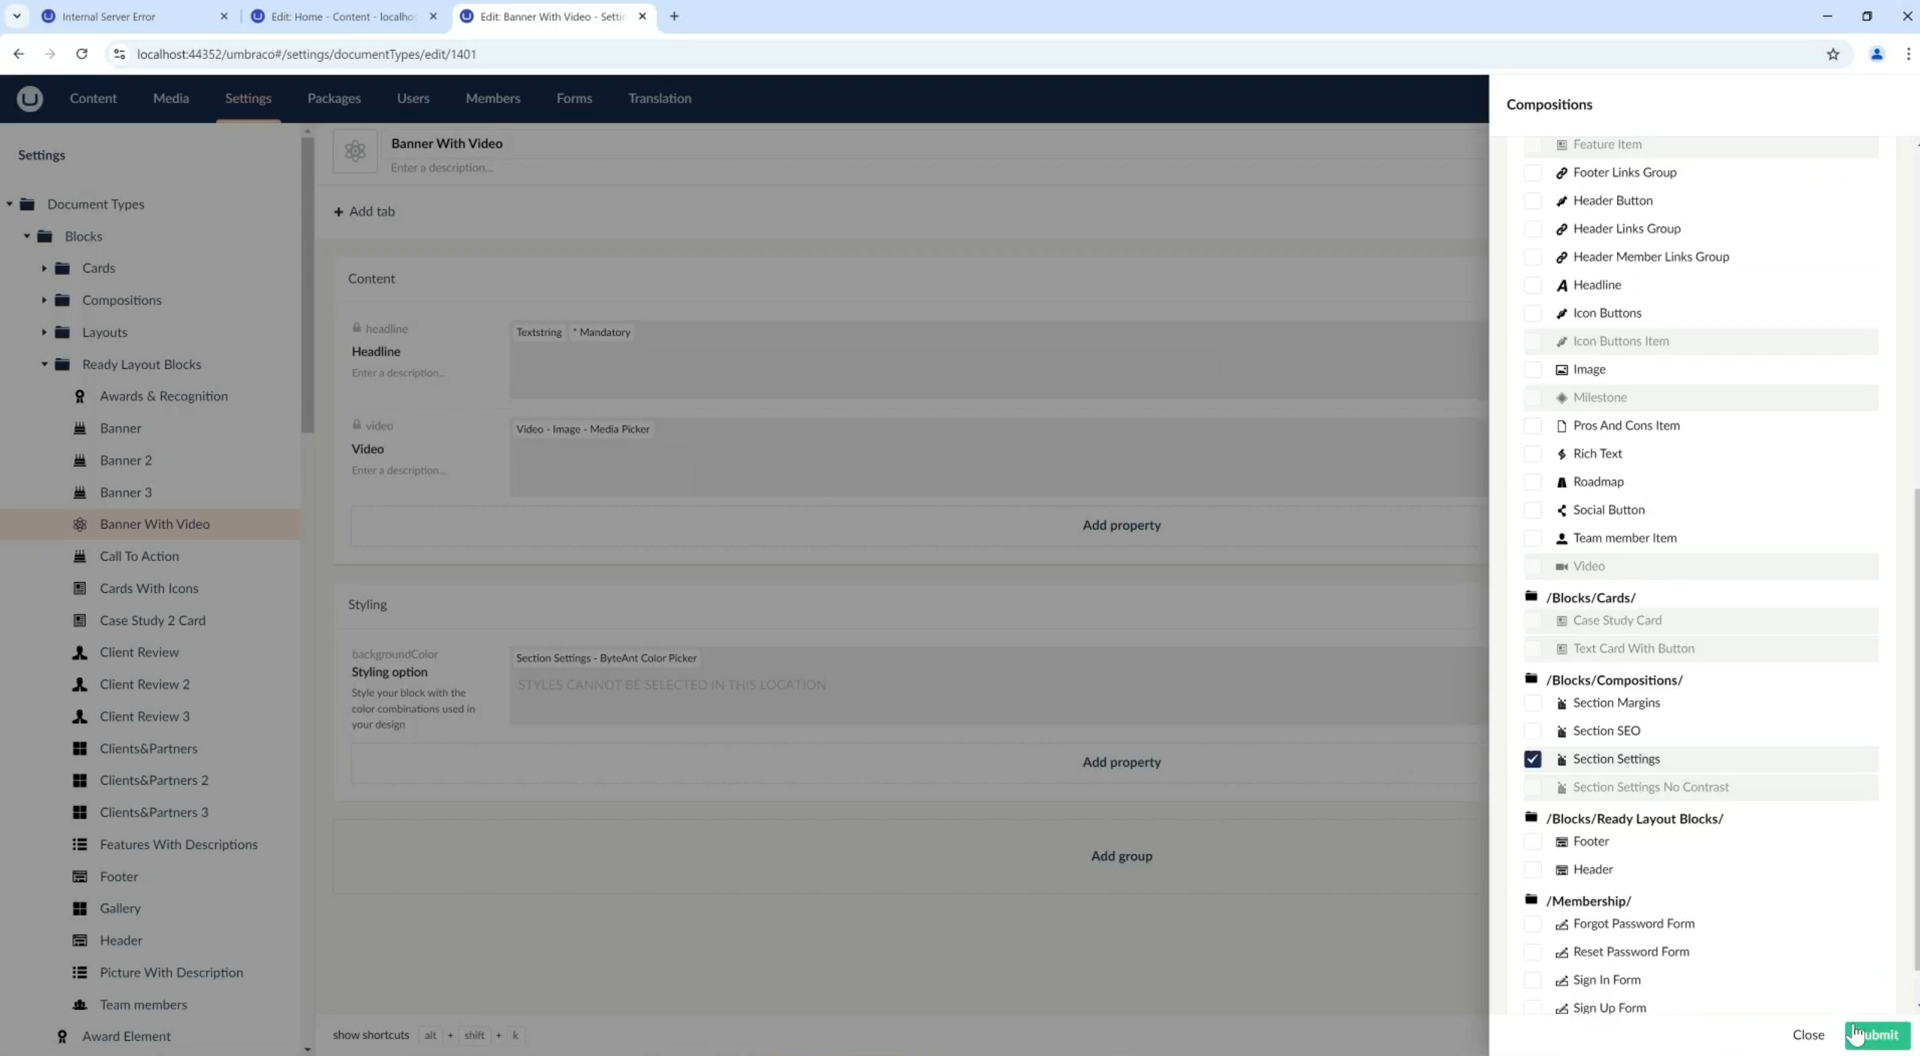
24. On the right side of the screen, find the “Compositions” button and click on it.
25. Scroll to the “/Blocks/Compositions/” block
26. Select the “Section Margins” and “Section Settings” checkboxes
27. Click on the "Submit" button
28. Click on the "Save" button
Step 3. How to create a front end view of the Ready Block
- Expand the "Partial Views" folder.
- Expand the "blockgrid" folder.
- If you hover over the "Components" folder in the content tree, you will see this icon: '...'. Click the icon.
- Click the "Create" button.
- Select “New empty partial view” from the list.
- In the name field, write “BannerWithVideoBlock.cshtml”
- Please copy the following code and paste it into the file
7. Click on the "Save" button
8. Restart the project
Step 4. How to add Ready Block to the Block Grid
- Open the Block Grid page
- Click on the “Content” block
- Click the "Edit" button for "Home - Main Grid - Block Grid"
- Scroll to Ready Layout Blocks section
- Click the “Add block” button
- Choose "Banner With Video" from the list
- Activate "Allow in the root"
- Make the “Allow in areas” field inactive.
- Click the " Areas" button on the top right corner
- Enter 6 in the "Grid Columns for Areas"
- Click the " Add" button for the Areas block
- For the “Alias” field, enter “hero”
- Click on the "Submit" button
- Specify the width of “12 columns” - full area width
- Add the path to the .html file for the Custom view field
~/App_Plugins/CustomBlockView/bannerWithVideoBlock.html - Add the path to the .css file for the “Custom stylesheet” field
~/css/index.min.css - Save your changes

Congratulations!
You have created your first Ready Blocks. Now you can add it to your design.